Before you can even think about fixing a damp wall, you need to put on your detective hat. Getting the diagnosis right is the single most important step. It's the difference between a simple fix, such as improved ventilation, and a major structural repair. If you get this wrong, you're just throwing money at a problem that’s guaranteed to come back. This is important whether you own your own property or are a landlord offering houses or rooms to rent.
Diagnosing the Cause of Your Damp Walls
Treating damp successfully isn't about slapping on a coat of anti-damp paint and hoping for the best. You've got to understand why the moisture is there in the first place. Think of that damp patch as a symptom. Your job is to trace it back to the root cause.
In the UK, the problem almost always boils down to one of three main culprits: condensation, penetrating damp, or rising damp.
Each type has its own distinct personality and leaves behind very specific clues. It’s a common and costly mistake to mix them up. For example, spending a fortune on a chemical damp-proof course to tackle what is actually a condensation issue will do absolutely nothing except drain your bank account.
The Three Main Culprits
Let's break down the tell-tale signs for each type of damp. Once you know what to look for, you can make a much more informed decision on how to fix it.
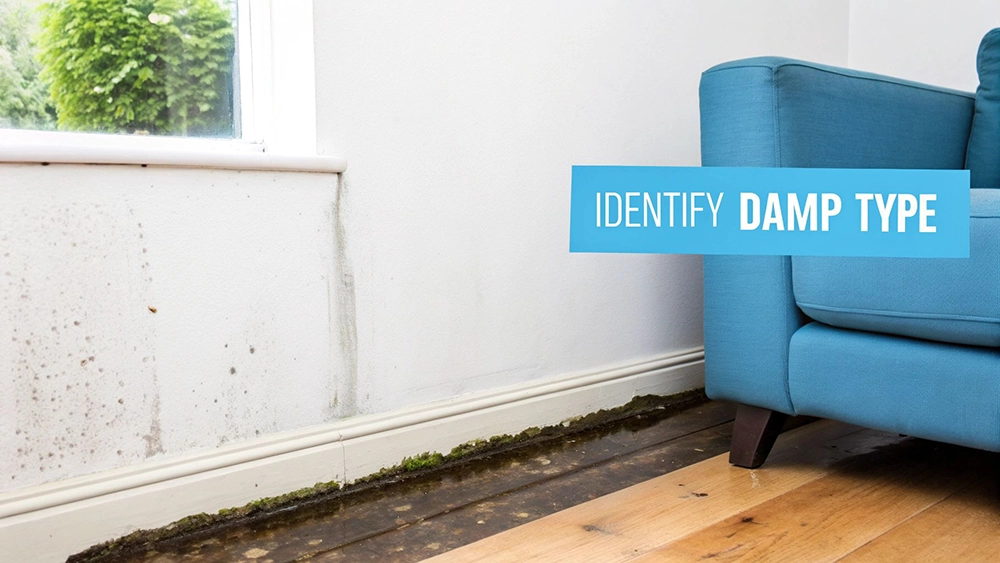
Condensation: This is by far the most common type of damp we see in UK homes. It happens when warm, moist air hits a cold surface—think external walls or windows. You’ll usually spot it as dark clusters of black mould, often lurking in corners, behind furniture, or around window frames. The wall might feel damp, and you'll probably notice persistent water droplets on your windows.
Penetrating Damp: This is when water from outside manages to find its way into your home. It can pop up at any level of the building, not just on the ground floor. It often shows up as distinct, isolated damp patches that feel properly wet to the touch, especially after a bout of heavy rain. The usual suspects are faulty guttering, cracked render, damaged roof tiles, or poor seals around windows and doors.
Rising Damp: This one is less common but generally more serious. Rising damp is exactly what it sounds like: groundwater soaking up through the brickwork of your property. It's a strictly ground-floor problem. The classic sign is a "tide mark" staining the wall, which rarely goes higher than one metre. Below this line, you’re likely to find crumbling plaster, peeling wallpaper, and decaying skirting boards.
To find a hopefully damp and mould-free room to rent, visit RoomsForLet now.
To help you gain a quick visual understanding, the decision tree infographic below provides a simple way to distinguish between the three types based on what you can see.

As the chart shows, your diagnosis starts with simple observation. Where the damp is and when it appears are your biggest clues. For landlords and homeowners, keeping good property management resources can help you track these patterns over time and spot problems early.
Here's a quick cheat sheet to help you compare the signs side-by-side.
Damp Diagnosis Cheat Sheet
| Type of Damp | Common Signs | Typical Location | Primary Cause |
|---|---|---|---|
| Condensation | Black mould spots, steamy windows, musty smell, damp-feeling surfaces. | Corners of rooms, behind furniture, around windows, in bathrooms and kitchens. | Poor ventilation and excess moisture in the air from daily activities. |
| Penetrating Damp | Isolated damp patches, watermarks/stains, plaster damage. Worsens after rain. | Walls, ceilings, or around windows/doors. Can occur at any level. | External defects like broken gutters, cracked render, or failed seals. |
| Rising Damp | A "tide mark" up to 1m high, peeling wallpaper, rotting skirting boards, salty deposits on walls. | Ground floor walls only. | Groundwater being drawn up through the brickwork due to a failed or absent damp-proof course. |
This table should give you a solid starting point. By matching the symptoms you see in your home to the descriptions here, you can build a confident diagnosis and move on to the right solution.
While damp can feel like a relentless issue, the data shows things are improving. In 2003, a significant 10.6% of homes in England had a damp problem. By 2022, that figure had dropped to 4.1%.
However, it’s older properties that remain the most vulnerable; 10.3% of homes built before 1919 are still affected, highlighting just how important it is to get on top of maintenance in period properties.
Winning the Battle Against Condensation
If your investigation is pointing a finger at condensation, I’ve got some good news. This is the most common cause of damp in UK homes, and thankfully, it’s also the most manageable.
Condensation isn’t really a structural problem; it’s more of a lifestyle issue. It stems from the moisture we all create every day through cooking, showering, and even just breathing. When this warm, moist air hits a cold surface—like an external wall or a window—it turns back into water droplets, creating the perfect breeding ground for that dreaded black mould.
The fix isn't some complex chemical treatment. It’s all about making a series of small, consistent changes to how you manage air and moisture in your home. The aim is simple: reduce the amount of water vapour in the air and improve ventilation so it doesn't have a chance to settle.
Boosting Your Home's Ventilation
Improving airflow is your number one weapon in the fight against condensation. I know a lot of people are reluctant to open windows in winter, worried about letting the heat out, but even 15-20 minutes a day can make a huge difference without sending your heating bills soaring.
Think of it as letting your house exhale. This simple act purges the damp, stale air and replaces it with fresher, drier air from outside.
For more targeted action, focus on the moisture hotspots:
- Kitchens and Bathrooms: Always, always use your extractor fan when you're cooking or showering. The crucial bit most people forget is to leave it running for at least 15-20 minutes after you’ve finished. This clears all that lingering steam.
- Airing Rooms: Get into the habit of opening bedroom windows for a short while each morning. We release a surprising amount of moisture as we sleep.
- Creating a Cross-Flow: If you can, open windows on opposite sides of your home for a few minutes. This creates a through-draught that clears the air incredibly quickly and effectively.
The goal is consistent air exchange. It's not about leaving windows wide open for hours in the cold; it's about making short, sharp bursts of ventilation part of your daily routine to fix damp walls caused by condensation.
Smart Moisture Management Strategies
Beyond just ventilating, you can take active steps to reduce how much moisture you’re putting into your home’s atmosphere in the first place. This is where a little forward-thinking goes a very long way.
One of the biggest culprits is drying laundry indoors. If you absolutely have to dry clothes inside, whatever you do, don't put them directly on radiators. That’s like using a steam machine to pump gallons of water vapour straight into the air.
Instead, use a clothes airer and pop it in a well-ventilated room—ideally with a window cracked open or, even better, a dehumidifier running nearby.
A good dehumidifier can be a complete game-changer if you have persistent condensation problems. These gadgets actively pull moisture from the air, collecting it as water. For the best results, place one in a central spot like a hallway or on a landing with the internal doors left open. This allows it to draw damp air from multiple rooms at once.
Of course, a reliable heating system is also essential for combating condensation; for those in more unique living situations, a high-quality diesel boat heater can provide the kind of dry, consistent warmth needed to keep damp at bay.
Finally, think about insulation. Condensation forms on cold surfaces, so if you can warm up those surfaces, you can stop it in its tracks. Improving your loft insulation or looking into cavity wall insulation makes external walls warmer on the inside, giving moisture fewer places to condense. This doesn't just tackle damp; it also lowers your heating bills—a clear win-win.
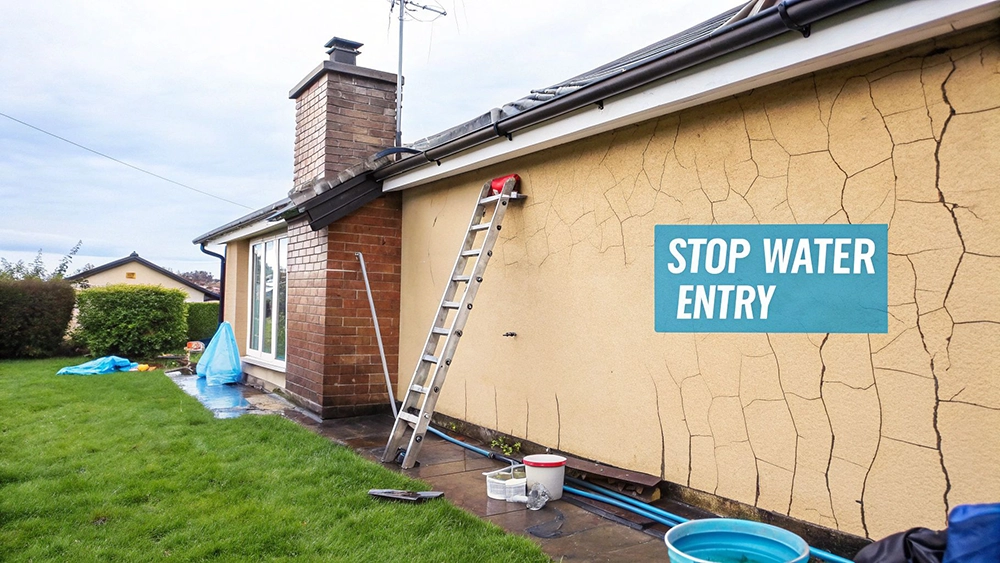
Right then, let's get to the root of penetrating damp. Unlike condensation, which is usually a lifestyle issue happening inside your home, penetrating damp is an outside job. It’s caused by water finding its way through your home's defences, typically after a spell of heavy rain. To fix it, you need to start thinking like water and trace its path into your property.
The good news is that the solutions are often surprisingly straightforward. A competent DIYer can tackle most of them, but the key is to be absolutely methodical. A tiny, overlooked crack can let a shocking amount of water seep into your walls over the months.
Before you even pick up a tool, it helps to have a clear picture of how your house is meant to keep water out in the first place. A solid understanding of your building's envelope and how all its parts work together is the first real step towards a successful, long-lasting repair.
Conducting Your External Wall Inspection
First things first, you need to get your eyes on the exterior of your home. Pick a dry day, grab a pair of binoculars if you have them – they’re brilliant for getting a proper look at higher-up spots – and start hunting for any weak points where water could be getting in.
Start your search with the usual suspects, as these account for the vast majority of problems:
- Gutters and Downpipes: Are they bunged up with leaves, moss, or old tennis balls? When gutters overflow, all that water cascades down the walls, saturating the brickwork. It’s hands-down one of the most common causes of penetrating damp.
- Roofing: Look for any slipped, cracked, or missing tiles. Pay really close attention to the flashing – the lead or waterproof material – around chimneys and where the roof joins a wall. Damaged flashing is a notorious weak spot for rainwater.
- Render and Brickwork: Scrutinise your walls for any cracks in the render or crumbling mortar between the bricks (this is called 'pointing'). Even hairline cracks can draw water in, where it gets trapped and causes all sorts of mischief.
- Windows and Doors: Check the sealant around the frames. Old mastic can shrink and pull away from the wall, creating a perfect channel for wind-driven rain. Also, have a poke at any wooden sills; if they haven't been maintained, they can rot and become porous.
I see this all the time – people only check for damp around the ground floor. But penetrating damp can strike anywhere, so make sure you inspect the entire exterior, from the roofline all the way down to the ground.
Actionable Fixes for Common Problems
Once you’ve pinpointed the entry points, you can move on to the repairs. For many of these jobs, a confident DIYer can achieve a permanent fix and save themselves hundreds of pounds in the process.
Repairing Cracked Render
For smaller cracks, the job is pretty simple. You’ll want to carefully open up the crack with a chisel, cutting it into a 'V' shape. This gives the new filler a decent surface to grab onto. Brush out all the dust and loose bits, then apply a good quality exterior filler or a fresh render mix with a filling knife, making sure you press it firmly into the gap.
Repointing Brickwork
If you've found patches of crumbling mortar, this needs to be raked out to a depth of roughly twice the width of the joint itself. A stiff brush will get rid of the last of the dust before you apply fresh mortar with a pointing trowel. Getting a perfect finish takes a bit of practice, but it's an incredibly satisfying job that dramatically improves your home's weatherproofing.
Clearing and Repairing Guttering
This is often a mucky job, but it’s absolutely vital. Get your gloves on, scoop out all the debris by hand, and then give the gutters and downpipes a good flush with a hose to check the water is running away freely. If you spot any drips or leaks at the joints, they can usually be sorted with a bead of specialist gutter sealant.
Now, while many of these fixes are well within reach, it's important to know your limits. Working at height, for instance, comes with obvious dangers. If the problem turns out to be major roof repairs or a whole wall needs repointing, calling in a professional is always the smartest and safest bet.
Understanding and Treating Rising Damp
Of all the types of damp, rising damp can feel like the most intimidating to tackle. It has a bit of a reputation, but it’s far from a mystery. It happens when groundwater from the earth is literally sucked up into the lower layers of your home’s brickwork through capillary action—think of how a sponge soaks up water. This can only happen when the property’s main defence, the Damp Proof Course (DPC), has failed, been damaged, or was never there in the first place.
A DPC is just a waterproof barrier built into the wall, usually sitting about 150mm above ground level. In older UK properties, you’ll often find they were made from materials like slate or bitumen. Over many decades, these can become brittle and crack, creating the perfect pathway for moisture to creep past them.
Installing a Modern Chemical DPC
While digging out and replacing an old slate DPC is a major, disruptive job, the modern fix is to install a chemical DPC. This is a clever solution where a specialist drills a series of holes into the mortar joint along the affected wall and injects a water-repelling, silicone-based cream. The cream then slowly spreads through the porous masonry, cures, and forms a brand-new, continuous waterproof barrier.
This is nearly always a job for the pros. It takes specialist kit to make sure the cream is injected under the right pressure to fully penetrate the brickwork. A DIY attempt often leads to an incomplete barrier, meaning the damp simply finds a way through and returns.
The accuracy of the drilling and injection process is everything. A poorly installed chemical DPC is effectively useless, as even the tiniest gaps in the new barrier will allow water to continue its upward journey.
While the overall prevalence of damp issues in UK homes has fallen by 17% in the last 10 years, complaints are actually on the rise. The Housing Ombudsman received over 16,000 complaints between 2019 and 2023, which really highlights how important correct, professional treatment is. You can discover more insights from the 2025 Mouldy Nation Report.
The Crucial Replastering Stage
Now for the step that so many people get wrong, leading to the problem seemingly coming back: you must remove the old plaster. It’s not optional. As groundwater rises through the bricks, it carries ground salts like chlorides and nitrates with it. These salts are hygroscopic, which is a fancy way of saying they attract and absorb moisture straight from the air.
Even after a new DPC has completely stopped any more water from rising up the wall, those salts are left behind, embedded in the plaster. On humid days, they will pull moisture from the atmosphere, creating fresh damp patches and making you think the whole treatment has failed.
The correct procedure always involves these steps:
- Strip Old Plaster: The contaminated plaster must be hacked off to at least 300mm above the highest point of the visible damp or tide mark. Don't be shy with it.
- Apply Salt-Resistant Render: The wall is then replastered using a very specific formula. This is usually a sand and cement render mixed with a salt inhibitor, or a specialist renovating plaster designed for the job.
- Final Skim Finish: A final skim coat is applied over the render to create a smooth surface, ready for you to redecorate.
Understanding this two-part process is absolutely essential. The new DPC only stops the source of the water; it's the removal of the salt-contaminated plaster that truly finishes the job and ensures your walls stay dry for good. When you're getting quotes for how to fix damp walls, make sure this critical replastering work is explicitly included.
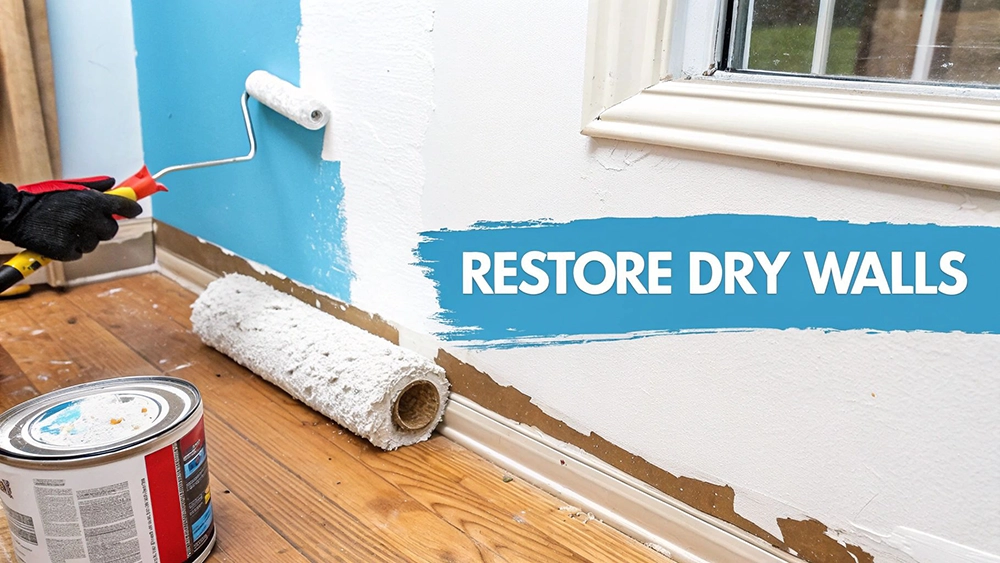
Repairing and Redecorating Damp-Damaged Walls
You’ve found the source of the damp and fixed it. That’s a massive win, but don’t crack open the paint just yet. The wall itself is the next battleground, and it's likely covered in damaged plaster, mould stains, and nasty salt deposits.
Rushing this next stage is a classic mistake. If you just paint over the problem, you're essentially trapping any leftover moisture inside the wall. All your hard work will be undone in a matter of months.
The single most important word right now is patience. Before you even think about redecorating, the wall must be completely dry. This isn’t a weekend job. A properly saturated wall can take ages to dry out—the rule of thumb is about one month for every inch of wall thickness. A good dehumidifier will certainly help speed things up, but there are no real shortcuts.
Preparing the Wall Surface
Once the wall is finally bone-dry to the touch, you can start the repair work. First things first, get rid of any lingering mould. Grab a specialist fungicidal wash and follow the instructions to the letter. You need to be absolutely sure you’ve killed off any remaining spores before moving on.
Next, it’s time to get tough on the plaster. If it feels soft, crumbles when you touch it, or has that tell-tale fluffy white coating of salt (efflorescence), it has to go. This is non-negotiable, especially if you've been dealing with rising damp. You need to hack it off to at least 300mm above the highest point where you could see the damp. This ensures you remove all the material contaminated with ground salts.
Don't be tempted to just patch things up or paint over damaged plaster. Those salts are hygroscopic, which means they literally pull moisture out of the air. If you paint over them, you’ll see fresh damp patches reappear on humid days, even though the original leak is long gone.
Choosing the Right Materials for Redecorating
When you’re finally ready to bring the room back to life, your choice of decorating materials is critical. The aim is to let the wall breathe, not suffocate it. For landlords navigating repairs, our broader blog at Rooms for Let offers more guidance on property maintenance.
Here’s a quick rundown of what you should be using:
- Primer and Paint: Steer clear of standard vinyl emulsions. They act like a plastic film, trapping moisture in the wall. You need to look for microporous or breathable paints, which are often marketed as being suitable for new plaster.
- Wallpaper: If you’re set on wallpaper, make sure you choose a breathable paper. Just as importantly, use a wallpaper paste that contains a fungicide to prevent any future mould growth.
Getting this right isn't just about a nice finish. It's about a lasting one. By patiently drying the wall, properly preparing the surface, and choosing the right breathable materials, you'll get a professional result that solves the problem for good.
Post-Damp Redecorating Product Guide
Choosing the right products is half the battle when redecorating after a damp issue. Using the wrong paint or filler can trap residual moisture and bring you right back to square one. This table breaks down what you need to look for to ensure your walls can breathe and stay dry for the long haul.
| Product Type | Purpose | Key Features to Look For |
|---|---|---|
| Fungicidal Wash | Kills mould spores and prevents regrowth on the surface. | HSE-approved, clear instructions, suitable for interior walls. |
| Salt Neutraliser | Applied to bare brickwork to stop salts from migrating into new plaster. | Specifically formulated for efflorescence; often a liquid application. |
| Renovating Plaster | A specialist plaster that is breathable and salt/moisture resistant. | Look for terms like "damp-resistant," "microporous," or "renovating." |
| Damp-Proof Membrane | A physical barrier applied to the wall before plastering. | Studded or meshed options; provides a guaranteed barrier. |
| Breathable Paint | A final decorative coat that allows moisture vapour to escape. | "Microporous," "breathable," or mineral-based paints (e.g., limewash). Avoid vinyl. |
By selecting materials with these features, you give your walls the best possible chance to manage any tiny amounts of residual moisture, preventing the damp from ever making a comeback.
Your Damp Wall Questions Answered
Spotting damp often kicks off a wave of questions. From "is this dangerous?" to "how much will this cost me?", getting your head around the problem is the first step to fixing it with confidence. Let's tackle some of the most common queries we hear from homeowners and landlords when they find a dreaded damp patch.
The first worry for most people is, quite rightly, health. Living with damp and mould is more than just unpleasant; it poses genuine health risks, especially for kids, the elderly, or anyone with a respiratory condition. Mould pumps out spores that can set off allergic reactions and even asthma attacks, so getting to the root cause quickly is non-negotiable.
Another big question is whether you can tackle it yourself. The honest answer? It really depends on what type of damp you're up against.
- Condensation: This is usually prime DIY territory. Simple changes like improving ventilation, cracking open windows, or investing in a good dehumidifier can make a world of difference.
- Minor Penetrating Damp: If the culprit is something straightforward like a blocked gutter or a tiny crack in the external render, a competent DIYer can often sort it out.
- Rising Damp: This is almost always a job for the pros. The specialist kit and expertise needed for treatments like a chemical DPC injection are well beyond the scope of a weekend DIY project.
When To Call A Professional
Knowing when to pick up the phone to an expert is a crucial call to make. You should always get professional help if the damp is widespread, you think there might be a structural problem, or you're pretty sure it’s rising damp. A wrong diagnosis or a botched repair job can end up costing you far more in the long run.
For landlords, there's also a legal duty to make sure the property is safe and habitable. Bringing in a professional not only gives you peace of mind but also provides a paper trail showing you've handled the issue correctly. For more on this, you can find helpful resources on landlord and tenant insurance requirements.
Don't put it off if you're not 100% sure. A qualified damp surveyor can give you a definitive diagnosis, saving you from throwing money at the wrong solution. Think of it as a small investment for a permanent fix.
Understanding Costs And Timelines
The cost of sorting out damp can vary massively. A recent government report found that in 2023, 5% of dwellings in England had a damp problem. Costs for simple fixes can start from around £300.
At the other end of the scale, significant issues like treating rising damp can easily top £5,000. You can read more about these official housing quality findings.
Timelines are just as varied. Clearing out a gutter is an afternoon's work. In contrast, allowing a wall to dry out properly after a rising damp treatment can take several months. A bit of patience is key to making sure the repair lasts for good.
At Rooms For Let, we connect landlords with tenants across the UK, offering a straightforward platform to advertise your spare rooms and find the right match quickly. Advertise your room for free and fill your vacancy today.